Getting started with PixInsight
by Enzo De Bernardini and Alejandro Tombolini
Introduction
This article will provide a starting guide for the PixInsight image processing platform from the first and most basic steps, intended for newbie users. The purpose of this guide is to show easy methods for the most important interface concepts, which once learned will allow the user to confidently advance in their use of the different processing tools.
If you do not have your PixInsight license yet, you can purchase it on the official site or request a trial license. We also recommend participating in PixInsight Forum.
Open an Image
There are several ways to open an image:
- Menu File › Open
- Double click over a free place on the workspace
- Using the File Explorer window
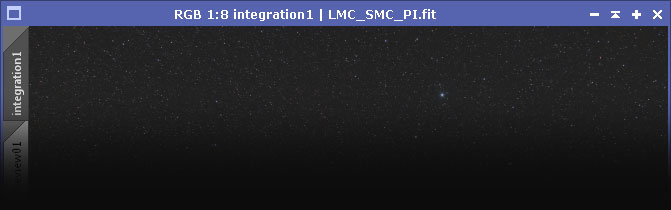
Once the image is opened it will have a unique identifier (ID) assigned which appears next to the file name in the title bar of the window. This identifier can be edited (see Set Image Identifier). The title bar of the image window also shows other data: channels (e.g. RGB) and zoom level (e.g. 1:1 = 100%). On the left side of each image window there are view selector tabs. The first is the main view (the main image) and underneath are any previews of the main view that the user has created.
Zoom Mode / Pan Mode
The two basic functions for examining a picture are zoom and pan. There are several ways to zoom the image, the most simple being to rotate the mouse wheel forward to zoom out and backward to zoom in. Note how the zoom factor changes in the title bar of the image window. In the zoom tool bar you will find keyboard shortcuts and other ways to zoom:
- Zoom In CTRL + +
- Zoom Out CTRL + -
- Zoom 1:1 CTRL + 1
Pan (image shift), can be activated from Tool Bar Mode or by using the keyboard shortcut ALT+P. Once activated, you can hold the left button and drag the image without using the window scroll bars. Another practical option is to use the button on the mouse wheel if your mouse has it. Pressing the wheel (without turning) temporarily switches to Pan Mode while you hold it. Now you can pan by moving the mouse. A keyboard shortcut that can also be useful is to hold the spacebar down while dragging the mouse with the left button pressed.
See how to clone pan and zoom from one image to other.
Previews
Previews are fundamental elements in the use of PixInsight. You can create as many as desired, and of any size (even covering the entire image), located where you want within the image window. The fastest and easiest way to create a preview is to use the New Preview Mode tool ![]() located in the Preview toolbar (see Tool Bar - Preview if this is disabled). On the main view of the image draw a rectangle of the desired size by clicking, holding and dragging, and then releasing the left button.
located in the Preview toolbar (see Tool Bar - Preview if this is disabled). On the main view of the image draw a rectangle of the desired size by clicking, holding and dragging, and then releasing the left button.
The new preview will appear as a new tab on the left of the image with its own ID. Click on the appropriate preview tab to make it active. Immediately after generating a preview the tool changes to edit mode and allows adjusting the size and position of the preview just made by dragging the rectangle or moving its edges or corners.
See video tutorials related to previews.
Process Console
The Process Console is always present and visible with each applied process or script. It is the place where processes will display data during execution. You may also enter commands directly in the process console, from simple (eg: clear and then ENTER to clear the display) to more complex (see Command Line Interface). It is a console window that opens each time a process or script is run. At first the data may be somewhat overwhelming, but as you get used to it you will find it can be a good reference.
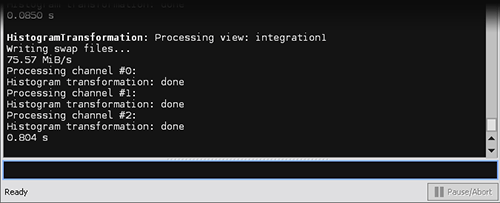
At the bottom of the console is the Pause/Abort button that can be used to interrupt a running process. It will warn you about termination of the process.
Process
The process modules can be found in the Process Explorer browser window (the most frequently used) and in the Process menu. There are nodes grouped into process families, and these nodes can be expanded and collapsed. There are also two special nodes: Favorites, where you can add your most frequently used processes and All Processes which lists all available processes.
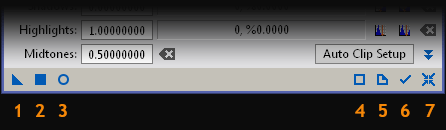
To open a process window double click on the name or icon. Process windows share many features along their bottom bar, where you see icons for different functions. Several of these icons are present in all processes, while others are in just a few. The following example shows the bottom of the HistogramTransformation (HT) process window.
Icons Description:
- New Instance
- Apply
- Real-Time Preview
- Edit Instance Source Code
- Browse Documentation
- Track View
- Reset
Apply Processes
Many processes (HistogramTransformation, CurvesTransformation, etc.) can be applied directly on an image or a preview by dragging and dropping the New Instance icon (blue triangle) on the target image or preview, or by clicking the Apply icon (F5) to apply the process to the active view.
When applying a process to a preview you can toggle between the before and after states by using the Undo Preview ![]() / Redo Preview
/ Redo Preview ![]() button on the Preview Tool bar or by using the SHIFT + CTRL + Z hotkey. This allows immediate evaluation of the effects of the process. Note that the same button switches between Undo and Redo, so repeated clicks on the same button toggle before/after.
button on the Preview Tool bar or by using the SHIFT + CTRL + Z hotkey. This allows immediate evaluation of the effects of the process. Note that the same button switches between Undo and Redo, so repeated clicks on the same button toggle before/after.
The previews are volatile: if not specified otherwise, the result of a process applied to a preview disappears when applying another process to the same preview . The "before" state of the preview always comes from the main view (the current image data). Applying multiple processes to the same preview will result in only the last process having an effect; earlier processes will be ignored.
Instance Icons Creation
All settings of a process can be saved as an instance icon by dragging the blue triangle of the process (New Instance) to a blank area of the workspace. This will save all the process settings, and a double-click on the instance icon will open the process window and load the data from the instance icon. This is a very useful operation in PixInsight, allowing you to experiment with different process configurations, save and reload them, and apply them to different images or previews.
To apply a process contained in a process icon to an image or preview, simply drag and drop the icon on the target image or preview.
Instance icons can be renamed, deleted and organized, among other things.
Scripts
Scripts are programs that apply different processes or functions when they are run. Many of these programs were written by PixInsight users using the Script Editor included in the platform, which provides different facilities to write the code.
Available scripts can be found in the Script menu grouped by functionality (Batch Processing, Image Analysis, Utilities, etc.), and within the Process Explorer under
There are many scripts with different features available. One of the most important is BatchPreprocessing (BPP) located under the category Batch Processing, which automates the tasks of preprocessing. This includes generating the calibration masters and performing calibration, alignment, de-Bayering and integration.
See also BPP videos and other script video tutorials>.
ScreenTransferFunction (STF)
After preprocessing, an astronomical image generally has much of its information compressed into a small portion of the histogram. Several processes should be applied while the image is in this linear state, prior to stretching. To be able to see the dark image in its linear state without affecting the image itself you can use the ScreenTransferFunction (STF) tool.

STF is usually invoked using ![]() , Auto Stretch, or CTRL + A. STF can use linked channels (where the same transformation is applied to all color channels) or unlinked (where an independent transformation will be applied to each color channel). This is selected by the Link RGB Channels icon (
, Auto Stretch, or CTRL + A. STF can use linked channels (where the same transformation is applied to all color channels) or unlinked (where an independent transformation will be applied to each color channel). This is selected by the Link RGB Channels icon (![]() ). You can also make manual adjustments to the transformation by dragging any of the triangular sliders along the bottom of the channel color bars. If the channels are linked, the corresponding triangles in all channels will all move simultaneously.
). You can also make manual adjustments to the transformation by dragging any of the triangular sliders along the bottom of the channel color bars. If the channels are linked, the corresponding triangles in all channels will all move simultaneously.
To activate/deactivate STF on the active image press the F12 key or use the ![]() icon on the STF tool. As with all processes, to return to the default values press the Reset button
icon on the STF tool. As with all processes, to return to the default values press the Reset button ![]() .
.
As shown in the following video, you can also use the ScreenTransferFunction toolbar for many of the process functions.
Remember that the ScreenTransferFunction only changes the visualization of the image and does not change the image itself. It does not affect the values of the image pixels, only the way the image is displayed. If the image is saved with STF applied it will not be altered by STF and will remain in the linear (dark) state. If desired it is possible to transfer STF values to the HistogramTransformation tool in order to permanently apply the effects of STF.
Masks
Masks protect certain areas of an image from the effects of an applied process. Typically a mask is a gray scale image, where a pixel value of 1 (white) represents a point where a process will be applied completely, and a pixel value of 0 (black) represents a point where the process will not be applied. In the intermediate pixel values between 1 and 0 the process will have intermediate result. An example of using a mask is the protection of background or stars.
You can generate a luminance mask by extracting the CIE L* component of an image using the button Extract CIE L* Component ![]() from the Image tool bar. The gray scale image which is created can be processed (for instance with the HistogramTransformation tool) to adjust it to the needs of the image to be protected.
from the Image tool bar. The gray scale image which is created can be processed (for instance with the HistogramTransformation tool) to adjust it to the needs of the image to be protected.
To apply a mask over an image in PixInsight the image and the mask must have the same dimensions, otherwise they will be incompatible. There are several ways to apply a mask:
- Menu Mask › Select Mask, with the main image active.
- Keyboard shortcut CTRL + M, with the main image active.
- Button Select Mask
 in the Mask toolbar.
 - Drag the mask image identifier tab and drop it in an empty part of the view selector region on the left side of the main image. The following video shows the procedure. This is usually the most convenient and the most used.
Note that the image identifier tab of the main image changes color when there is an active mask applied.
Masks have different states that can be controlled from the Mask toolbar:
- Invert Mask SHIFT + CTRL + I
 - Invert the application of the mask, which is equivalent to inverting the values of the mask image. When applied to an image this does not change the mask, it only reverses the mask as applied to the image.
 - Enable/Disable Mask SHIFT + CTRL + M
 - Enable and disable the mask. The mask remains applied to the image, but its effect is activated or deactivated. Note that the color of the image identifier switches when the mask is enabled or disabled.
 - Show Mask CTRL + K
 - Shows and hides the mask applied to the main image. The mask is shown overlaid on the image in order to visualize its effect. The default mask color is red, but this may be changed from the Mask Rendering Mode toolbar or from the Mask › Rendering Mode menu.
Note that the mask can be active and hidden (not visible but having an effect), or inactive and visible (visible, but having no effect). The status of Enable/Disable Mask and Show Mask are independent. You can check the status of the buttons on the Mask toolbar and the color in the image identifier tab to determine if a mask is applied and/or active.
To remove a mask (unlink the main picture image from the mask image) you can use the Remove Mask ![]() button from the Mask toolbar, or the menu option Mask › Remove Mask.
button from the Mask toolbar, or the menu option Mask › Remove Mask.
See mask video tutorials.
Projects
PixInsight can create projects, which keep the complete state of all images, previews, instance icons and processes, including their processing histories. The entire state is saved so it can be started up at another time, which is very useful to freeze an image processing job so you can continue it later.
Save Project SHIFT + CTRL + J ![]() - Opens a window where you can select a name and destination for the project. You can also specify the name of the author (Author) and descriptive text (Description). Additional options can be specified, but usually the defaults will be fine. Saved projects are divided into two main parts: the project file (.xosm) and a folder of the same name with the contents of the project. If you wish to port the project you should copy both the file and the folder. See video.
- Opens a window where you can select a name and destination for the project. You can also specify the name of the author (Author) and descriptive text (Description). Additional options can be specified, but usually the defaults will be fine. Saved projects are divided into two main parts: the project file (.xosm) and a folder of the same name with the contents of the project. If you wish to port the project you should copy both the file and the folder. See video.
Load Project CTRL + J ![]() - Opens a file browser window to locate and open a project file (.xosm). It may take some time to load. See video.
- Opens a file browser window to locate and open a project file (.xosm). It may take some time to load. See video.
Note that, depending on the processing performed, the project files can take a significant amount of disk space (on the order of several gigabytes).